Set Up Dynamic Remarketing with Google Ads
Complete guide to setting up dynamic remarketing on Google Ads: product feeds, tags (GTM), dynamic campaigns, and performance optimization.
Setting up dynamic remarketing with Google Ads allows you to display personalized ads based on the products or services viewed by your visitors. This method automates ads through a product feed linked to Google Merchant Center and specific tags on your site. Here are the key steps for success:
- Create a product feed in Google Merchant Center with information such as product ID, price, and availability.
- Link Google Ads and Merchant Center to synchronize product data.
- Install a remarketing tag via Google Tag Manager or manually on your site.
- Set up dynamic campaigns using smart bidding strategies like target CPA or target ROAS.
- Analyze performance through metrics like CTR, conversion rate, and ROAS.
Tools like Feedcast.ai can simplify the management and optimization of your product feed.
To succeed, ensure your data is accurate, your tags are correctly configured, and your campaigns are optimized to convert your visitors into customers.
::: @figure 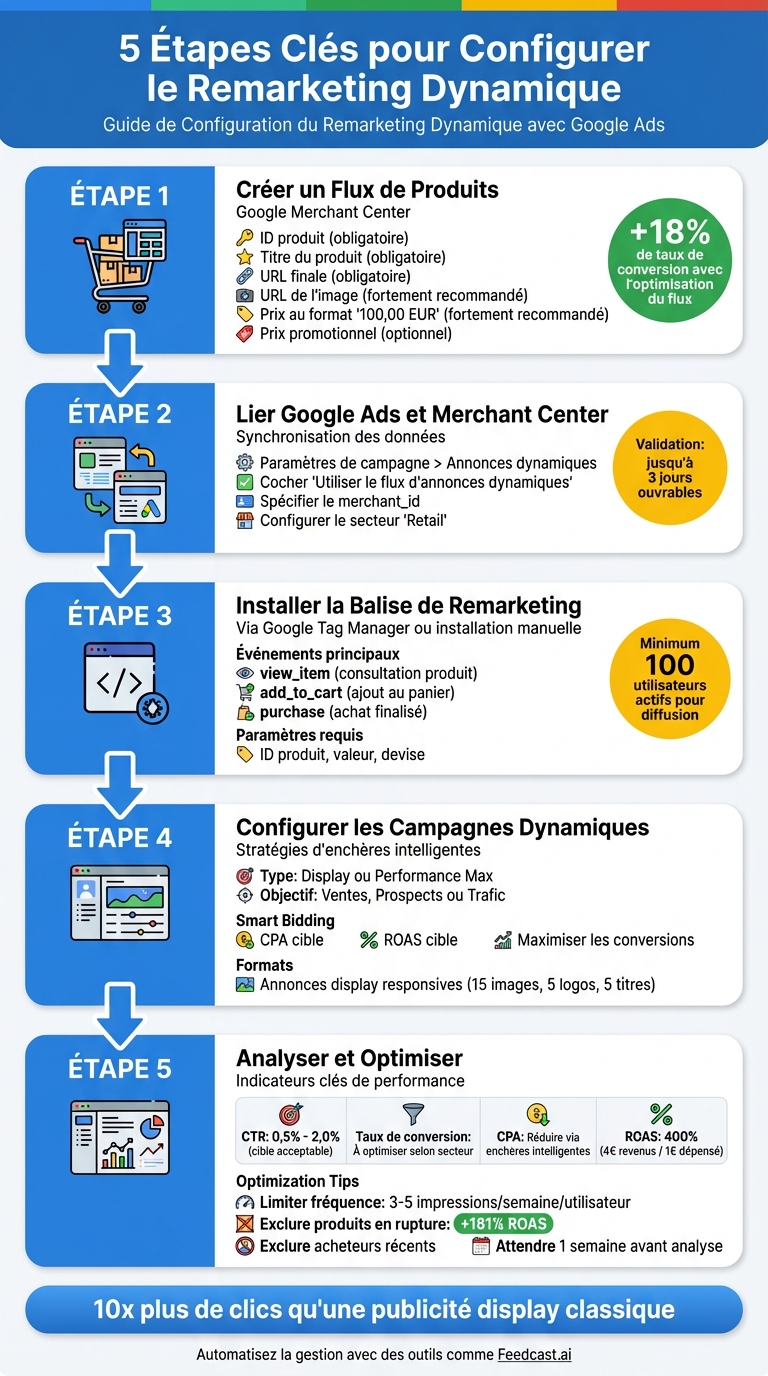 {Complete Guide: 5 Steps to Set Up Dynamic Remarketing Google Ads}
Setting Up the Product Feed and Data Sources
Preparing the Product Feed in Merchant Center
Establishing a well-structured product feed in Google Merchant Center is essential for the success of your campaigns. This feed must include the essential attributes for each product. Among the mandatory fields are: the unique ID (matching the one provided by your remarketing tag), the product title, the final URL of the product page, and the image URL. To maximize your performance, it is also advisable to add attributes like price (in the format "100.00 EUR") and availability of the product.
For example, the agency Midsummer demonstrated that careful optimization of the feed can make a difference: by highlighting promotional products using the sale_price attribute, they recorded an 18% increase in conversion rate [6]. Additionally, when the promotional price is lower than the standard price, Google automatically applies badges like "Sale" or "Price Drop," making your dynamic ads even more visible [8].
| Attribute | Status | Description |
|---|---|---|
| ID | Required | Unique identifier, to match with the one from the site tag [3] |
| Product Title | Required | Short and descriptive name of the product |
| Final URL | Required | Link to the product page |
| Image URL | Highly recommended | Image in PNG, JPG, or GIF format, ideally 300x300 pixels in RGB [3] |
| Price | Highly recommended | Amount with ISO 4217 currency code (e.g., 100.00 EUR) [3] |
| Sale Price | Optional | Activates "Sale" or "Price Drop" badges in ads [8] |
Once your feed is configured, ensure you connect it to Google Ads to enable dynamic remarketing.
Linking Google Ads and Merchant Center
After optimizing your feed, it is essential to link it to Google Ads to fully leverage your product data. This linking is done directly at the account level. Before launching your first campaign, go to the settings of your Display, Performance Max, or App campaign. In the "Additional Settings" section, expand "Dynamic Ads" and check the option "Use dynamic ad feed for personalized ads" [5]. Don’t forget to specify the Merchant ID (merchant_id) of your Google Merchant Center account.
To ensure proper functioning, set your campaign for the "Retail" sector. This allows Google to correctly map the attributes of your feed (such as product ID, price, or availability) [4][2]. Note that feed validation can take up to three business days. Be sure to quickly check for any errors, such as inaccessible images or SSL issues, about 3 to 4 hours after the initial processing [6].
Using Feedcast.ai for Feed Management

Feedcast.ai is a practical solution for centralizing and automating the management of your feed. This platform synchronizes your product data from CMSs like Shopify, WooCommerce, or PrestaShop directly to Google Merchant Center. It identifies and corrects potential errors (invalid URLs, incorrect price formats, out-of-stock products) before they cause product rejections. Additionally, it enhances your titles and descriptions through AI-based optimization.
With Feedcast.ai, you can set conditional rules, for example: "If availability = 'out of stock', then exclude from the campaign" [6]. This helps you avoid wasting your budget on unavailable products. For businesses selling in multiple countries, the platform offers the ability to create separate feeds for each language and currency, ensuring ads are tailored to each market.
Setting Up the Dynamic Remarketing Tag
Installing the Remarketing Tag
To enable dynamic remarketing, you need to install a tag on your site. You have two options: a manual installation or using Google Tag Manager (GTM), which simplifies tag management.
If you choose manual installation, access Google Ads by going to Tools > Shared Library > Audience Manager. Then, in the Your Data Sources section, click on Set up the tag in the Google Ads tag card. Choose the option "Collect specific attributes or parameters to customize ads" and select your industry, such as "Retail." Copy the generated code and insert it between the <head> and </head> tags of each page of your site.
With Google Tag Manager, start by retrieving the Conversion ID from the tag setup instructions in Google Ads. Then create a new tag in GTM, of type Google Ads Remarketing, enter the Conversion ID, and configure the appropriate triggers, such as "All Pages" for the base tag or "Custom Events" for specific interactions like adding to cart. Once the tag is configured, add the necessary events to track user actions.
Key Events and Parameters for Dynamic Remarketing
Dynamic remarketing relies on events that record user interactions with your products. The main events include: view_item (viewing a product page), add_to_cart (adding to cart), and purchase (completed purchase). These events must transmit essential information, such as:
- Product ID (
idorecomm_prodid): unique identifier of the product. - Value (
value): price of the product, e.g., 99.99. - Currency (
currency): ISO 4217 code, like "EUR". - Business Sector (
google_business_vertical): set to "retail" for e-commerce.
"IDs are important to include in your feed because they are used by your Google tag to connect people from your lists with the products they have viewed." - Google Ads Support [3]
For Google to display relevant products, the captured IDs must match perfectly (case and format included) with those in your feed. If a button like "Add to Cart" does not reload the page, use dataLayer.push() to log the event asynchronously [4]. Proper configuration and reliable data are essential to ensure the system functions correctly.
Data Quality and Debugging
After installing your tags, test them with diagnostic tools like Google Tag Assistant (Chrome extension). This tool allows you to check in real-time if your tags are working and if the transmitted data is correct. Ensure that product IDs, prices (with a dot as the decimal separator, e.g., 100.00), and currency codes match perfectly with your feed.
Use event names in English (e.g., "cart" instead of "panier") so they are recognized by the system [10]. If no data is received for seven days, Google Ads will report an inactivity error [9]. Finally, your audience list must contain at least 100 active users before your ads can be displayed [9].
Creating and Configuring a Dynamic Remarketing Campaign
Campaign Setup
To start, create a new campaign in Google Ads by choosing an appropriate goal, such as "Sales," "Leads," or "Website Traffic." Then select the campaign type "Display" or "Performance Max." Set a daily budget: Google Ads will automatically calculate a monthly cap based on this amount.
Adopt a Smart Bidding strategy, such as target CPA or Maximize Conversions, to automate and optimize your bids. These strategies are particularly suited for dynamic remarketing, as they adjust according to the likelihood of conversion for each user. Once this step is complete, it’s time to connect your product feed to the campaign.
Attaching the Product Feed
In the campaign settings, go to "Additional Settings" and click on "Dynamic Ads." Enable the option "Use a dynamic ad feed for personalized ads," then select the appropriate feed from your Merchant Center or business data. This integration allows Google to automatically extract information such as images, prices, and product descriptions to personalize ads based on the pages visited by your users.
To simplify management and ensure real-time updates of your product data, use tools like Feedcast.ai. Once the feed is connected, you can proceed to targeting and ad creation.
Audience Targeting and Ad Creation
For targeting, you have two approaches: either manually segment your audience (for example, visitors who abandoned their cart or recent buyers), or let Google’s algorithm automatically select relevant audiences. To maximize your reach, it is advisable not to impose restrictions on language, location, or placements, as visitors are already familiar with your brand and are primarily influenced by product relevance and pricing.
For ads, create responsive display formats by uploading up to 15 images, 5 logos, 5 short headlines (maximum 30 characters), 1 long headline (maximum 90 characters), and 5 descriptions. Google will automatically adjust the layout according to the user's context. Ensure to use high-quality visuals, including at least one landscape version and one square version. Also, incorporate compelling promotional messages, such as "Free delivery within 48 hours" or "-30%," to capture more attention.
A case study conducted by the agency Midsummer showed that by filtering promotional products at the campaign level, an e-commerce client recorded an 18% increase in their conversion rate [6].
Testing, Monitoring, and Optimizing Campaigns
Testing and Verifying Campaign Configuration
Before launching your campaign, ensure everything works as expected. Use the Preview mode in Google Tag Manager to check that your tags trigger correctly on key pages: product detail, cart, and purchase confirmation. Also, verify that dynamic values, such as product ID, cart value, or items, are being transmitted correctly [4].
In Google Ads, check the "Audience Manager" section to monitor if your specific remarketing lists are filling up. For example, the "All Visitors" list should grow if your tags are functioning correctly [6]. On the product feed side, review the "Business Data" section or your Merchant Center to identify common errors such as missing attributes, incorrect price formats, or inaccessible image URLs. Note that feed processing can take between 3 and 4 hours [6].
To detect potential technical errors, use the JavaScript console via Google Tag Assistant [4].
Key Metrics to Monitor
Once the configuration is validated, analyze the performance of your campaigns. Wait about a week before drawing conclusions, as initial data may be incomplete [8]. Focus on four main metrics:
- Click-Through Rate (CTR): Indicates whether your ads capture attention. An acceptable CTR ranges from 0.5% to 2.0% [11].
- Conversion Rate: Measures the effectiveness of your ads in generating sales.
- Cost Per Acquisition (CPA): Evaluates the profitability of your advertising spend.
- Return on Ad Spend (ROAS): Shows overall profitability. A ROAS of 400% (4€ in revenue for every 1€ spent) is a good target [11].
| Metric | What it Measures | Optimization Target |
|---|---|---|
| CTR | Relevance and appeal of ads | Improve with quality visuals and personalized headlines [6][11] |
| Conversion Rate | Effectiveness of the offer and landing page | Increase by targeting cart abandoners with specific offers [11] |
| CPA | Profitability of advertising spend | Reduce by using smart bidding like target CPA [[11]](https |
Yohann B.