Set Up Dynamic Remarketing with Google Ads
Comprehensive guide to setting up dynamic remarketing on Google Ads: product feeds, tags (GTM), dynamic campaigns, and performance optimization.
Setting up dynamic remarketing with Google Ads allows you to serve personalized ads based on the products or services your visitors viewed. This method automates ads using a product feed linked to Google Merchant Center and specific tags on your site. Here are the key steps to succeed:
- Create a product feed in Google Merchant Center with information like product ID, price, and availability.
- Link Google Ads and Merchant Center to synchronize product data.
- Install a remarketing tag via Google Tag Manager or manually on your site.
- Configure dynamic campaigns using smart bidding strategies such as target CPA or target ROAS.
- Analyze performance using metrics like CTR, conversion rate, and ROAS.
Tools like Feedcast.ai can simplify managing and optimizing your product feed.
For success, ensure your data is accurate, your tags are correctly configured, and your campaigns are optimized to convert visitors into customers.
::: @figure 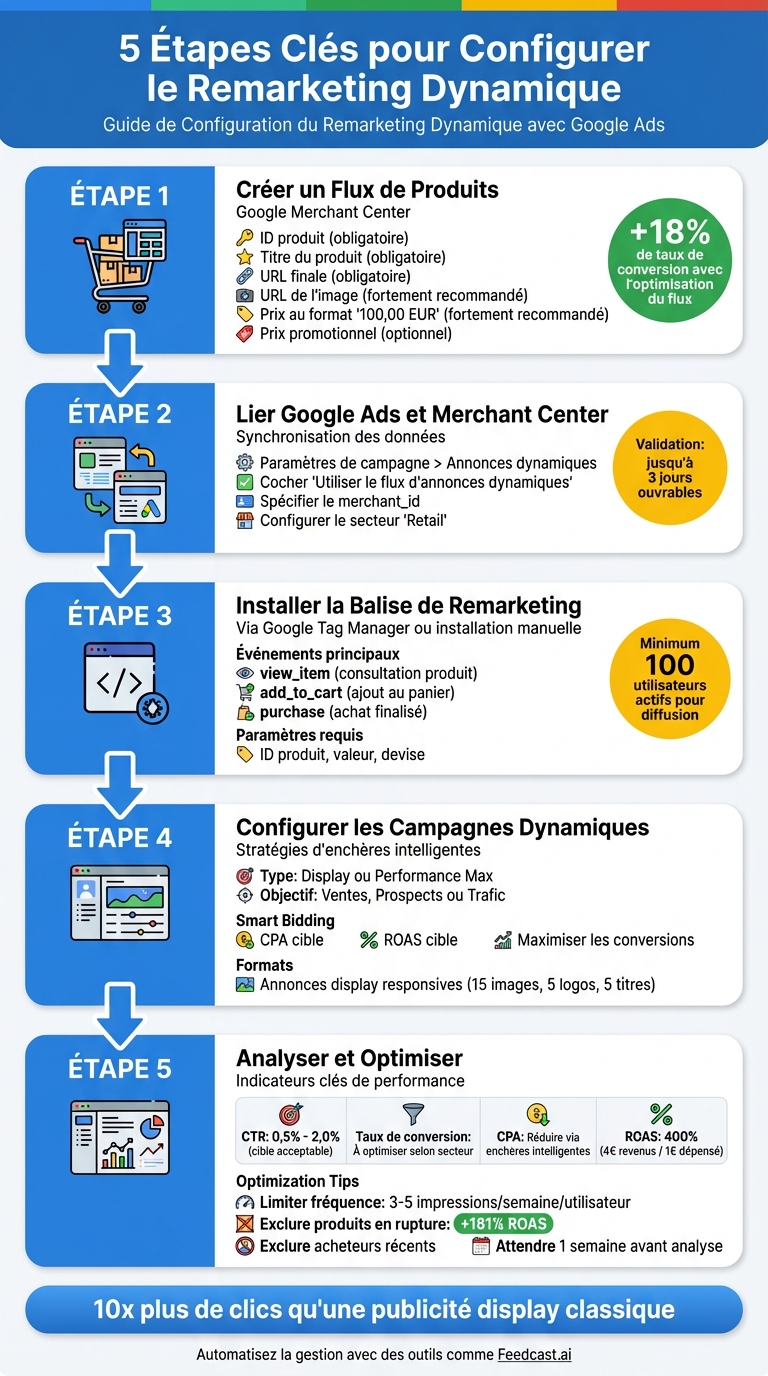 {Complete guide: 5 steps to set up Google Ads dynamic remarketing}
Product Feed and Data Source Configuration
Preparing the Product Feed in Merchant Center
Setting up a well-structured product feed in Google Merchant Center is essential to the success of your campaigns. This feed should include the essential attributes for each product. Among the required fields are: the unique ID (matching the one sent by your remarketing tag), the product title, the final URL of the product page, and the image URL. To maximize performance, it is also recommended to add attributes such as price (in the format "100,00 EUR") and the product availability.
For example, the agency Midsummer showed that careful feed optimization can make a difference: by highlighting promotional products using the sale_price attribute, they recorded an 18% increase in conversion rate [6]. Additionally, when the sale price is lower than the standard price, Google automatically applies badges like "Sale" or "Price drop", making your dynamic ads even more visible [8].
| Attribute | Status | Description |
|---|---|---|
| ID | Required | Unique identifier, to be matched with the site tag [3] |
| Product title | Required | Short, descriptive product name |
| Final URL | Required | Link to the product page |
| Image URL | Highly recommended | Image in PNG, JPG, or GIF format, ideally 300x300 pixels in RGB [3] |
| Price | Highly recommended | Amount with ISO 4217 currency code (e.g.: 100,00 EUR) [3] |
| Sale price | Optional | Enables "Sale" or "Price drop" badges in ads [8] |
Once your feed is configured, make sure to connect it to Google Ads to enable dynamic remarketing.
Linking Google Ads and Merchant Center
After optimizing your feed, it is essential to link it to Google Ads to fully leverage your product data. This link is done at the account level. Before launching your first campaign, go to the settings of your Display, Performance Max, or App campaign. In the "Additional settings" section, expand "Dynamic ads" and check the option "Use the dynamic ads feed for personalized ads" [5]. Don’t forget to specify the Merchant ID (merchant_id) of your Google Merchant Center account.
To ensure proper functioning, configure your campaign for the "Retail" sector. This allows Google to correctly map your feed attributes (such as product ID, price, or availability) [4][2]. Note that feed approval can take up to three business days. Be sure to quickly check for any errors, such as inaccessible images or SSL issues, about 3 to 4 hours after the initial processing [6].
Using Feedcast.ai for Feed Management

Feedcast.ai is a convenient solution to centralize and automate your feed management. This platform syncs your product data from CMSs like Shopify, WooCommerce, or PrestaShop directly to Google Merchant Center. It identifies and fixes potential errors (invalid URLs, incorrect price formats, out-of-stock products) before they cause product disapprovals. Additionally, it improves your titles and descriptions through AI-based optimization.
With Feedcast.ai, you can set conditional rules, for example: "If availability = 'out of stock', then exclude from the campaign" [6]. This helps you avoid wasting budget on unavailable products. For businesses selling in multiple countries, the platform allows creating separate feeds for each language and currency, ensuring ads tailored to each market.
Setting Up the Dynamic Remarketing Tag
Installing the Remarketing Tag
To enable dynamic remarketing, you need to install a tag on your site. You have two options: a manual installation or using Google Tag Manager (GTM), which simplifies tag management.
If you choose manual installation, go to Google Ads by navigating to Tools > Shared library > Audience manager. Then, in the Your data sources section, click Set up the tag on the Google Ads tag card. Choose the option "Collect attributes or specific parameters to customize ads" and select your business vertical, such as "Retail". Copy the generated code and insert it between the <head> and </head> tags of every page on your site.
With Google Tag Manager, start by retrieving the conversion ID from the tag setup instructions in Google Ads. Then create a new tag in GTM of type Google Ads Remarketing, enter the conversion ID, and set the appropriate triggers, such as "All Pages" for the base tag or "Custom Events" for specific interactions like add_to_cart. Once the tag is configured, add the necessary events to track user actions.
Key Events and Parameters for Dynamic Remarketing
Dynamic remarketing relies on events that record users' interactions with your products. The main events include: view_item (product page view), add_to_cart (add to cart) and purchase (completed purchase). These events must send essential information, such as:
- Product ID (
idorecomm_prodid): unique product identifier. - Value (
value): product price, for example 99.99. - Currency (
currency): ISO 4217 code, like "EUR". - Business vertical (
google_business_vertical): set to "retail" for e-commerce.
"IDs are important to include in your feed because they are used by your Google tag to match people on your lists with the products they viewed." - Google Ads Support [3]
For Google to show relevant products, the captured IDs must match exactly (including case and format) those in your feed. If a button like "Add to cart" does not reload the page, use dataLayer.push() to record the event asynchronously [4]. Proper configuration and reliable data are essential to ensure the system works correctly.
Data Quality and Debugging
After installing your tags, test them with diagnostic tools like Google Tag Assistant (Chrome extension). This tool allows you to verify in real time whether your tags are working and whether the data being sent is correct. Make sure product IDs, prices (with a dot as the decimal separator, for example 100.00) and currency codes match your feed exactly.
Use event names in English (for example "cart" instead of "panier") so they are recognized by the system [10]. If no data is received for seven days, Google Ads will report an inactivity error [9]. Finally, your audience list must contain at least 100 active users before your ads can be served [9].
Creating and Configuring a Dynamic Remarketing Campaign
Campaign Setup
To get started, create a new campaign in Google Ads by choosing an appropriate objective, such as "Sales", "Leads" or "Website traffic". Then select the campaign type "Display" or "Performance Max". Set a daily budget: Google Ads will automatically calculate a monthly cap based on that amount.
Adopt a Smart Bidding strategy, such as target CPA or Maximize conversions, to automate and optimize your bids. These strategies are particularly suited to dynamic remarketing because they adjust according to each user's likelihood to convert. Once this step is complete, it's time to connect your product feed to the campaign.
Attaching the Product Feed
In the campaign settings, go to "Additional settings" and click on "Dynamic ads". Enable the option "Use a dynamic ads feed for personalized ads", then select the appropriate feed from your Merchant Center or business data. This integration allows Google to automatically pull information like images, prices and product descriptions to personalize ads based on the pages your users visited.
To simplify management and ensure real-time updates of your product data, use tools like Feedcast.ai. Once the feed is connected, you can move on to targeting and ad creation.
Audience Targeting and Ad Creation
For targeting, you have two approaches: either manually segment your audience (for example, visitors who abandoned their cart or recent purchasers), or let Google's algorithm automatically select relevant audiences. To maximize reach, it's recommended not to impose restrictions on language, location or placements, since visitors already know your brand and are mainly influenced by product relevance and price.
For ads, create responsive display formats by uploading up to 15 images, 5 logos, 5 short headlines (maximum 30 characters), 1 long headline (maximum 90 characters) and 5 descriptions. Google will automatically adjust the layout according to the user's context. Make sure to use high-quality visuals, including at least one landscape and one square version. Also include compelling promotional messages, such as "Free shipping within 48h" or "-30%", to capture more attention.
A case study by the agency Midsummer showed that by filtering discounted products at the campaign level, an e-commerce client recorded an 18% increase in conversion rate [6].
Tests, Tracking and Campaign Optimization
Campaign Configuration Testing and Verification
Before launching your campaign, make sure everything works as expected. Use the Preview mode of Google Tag Manager to verify that your tags fire correctly on key pages: product page, cart and purchase confirmation. Also check that dynamic values, such as product ID, cart value or items, are being passed correctly [4].
In Google Ads, review the "Audience Manager" section to monitor whether your specific remarketing lists are filling. For example, the "All visitors" list should grow if your tags are working correctly [6]. On the product feed side, check the "Business data" section or your Merchant Center to identify common errors like missing attributes, incorrect price formats, or inaccessible image URLs. Note that feed processing can take between 3 and 4 hours [6].
To detect potential technical errors, use the JavaScript console via Google Tag Assistant [4].
Key Metrics to Monitor
Once the configuration is validated, analyze your campaign performance. Wait about a week before drawing conclusions, as initial data can be incomplete [8]. Focus on four main metrics:
- Click-through rate (CTR) : Indicates whether your ads capture attention. An acceptable CTR is between 0.5% and 2.0% [11].
- Conversion rate : Measures how effective your ads are at generating sales.
- Cost per acquisition (CPA) : Assesses the profitability of your ad spend.
- Return on ad spend (ROAS) : Shows overall profitability. A ROAS of 400% (4 € of revenue for 1 € spent) is a good target [11].
| Metric | What it measures | Optimization target |
|---|---|---|
| CTR | Relevance and appeal of the ads | Improve with quality visuals and personalized headlines [6][11] |
| Conversion rate | Effectiveness of the offer and landing page | Increase by targeting cart abandoners with specific offers [11] |
| CPA | Profitability of ad spend | Reduce using smart bidding like Target CPA [11] |
| ROAS | Overall profitability | Maximize by favoring high-value products [11][7] |
Campaign Performance Optimization
To get solid results, your data must be reliable. Once you have the metrics, adjust your bids and targeting in real time. Limit ad frequency to 3-5 impressions per week per user to avoid ad fatigue [11]. Exclude users who have already purchased to avoid wasting your budget [11]. For bidding, favor automated strategies like "Target CPA" or "Target ROAS", which adjust your bids based on each impression's conversion potential [7][2].
Product feed quality also plays a crucial role. For example, excluding out-of-stock products can increase your ROAS by 181% [12]. If you manage multiple channels, tools like Feedcast.ai can automate your data updates. Finally, segment your audiences based on behavior: a user who abandoned their cart requires a different approach than someone who only viewed a product page [11].
SEA Intermediate Level #8: Set up Google Ads Dynamic Remarketing via Google Tag Manager

Conclusion
Dynamic remarketing in Google Ads relies on three key elements: a well-structured product feed, precise tracking of user actions and constant performance optimization. Every detail matters. For example, without a complete feed including information like the product ID, the price or the images, Google cannot display your items correctly [3][1]. Similarly, a misconfigured tag can prevent the system from linking users to the products they viewed [4][1].
Data quality is a decisive factor. A feed containing incomplete or poorly formatted information can block the serving of your ads. Conversely, including optional attributes like sale_price allows displaying labels such as "Price drop", which attract more buyers' attention. Did you know users are 10 times more likely to click on a remarketing ad than a standard display ad [6]? This clearly shows the impact of a careful setup.
Automation greatly simplifies daily management. Tools like Feedcast.ai allow you to centralize product data, automatically map the necessary attributes and synchronize your inventory in real time. Thus, out-of-stock items are automatically excluded, reducing manual errors and ensuring ads are always up to date.
Once your data is automated and reliable, it's time to evaluate your performance. Let the system adjust for a week before you start analyzing results [8]. Pay special attention to key metrics like CTR, conversion rate, CPA and ROAS. To maximize your results, use smart bidding strategies such as target CPA or target ROAS, which allow the algorithm to calculate the optimal bid in real time [2][7]. Also consider segmenting your audiences: a visitor who abandoned their cart needs a personalized message, different from someone who simply viewed a product page.
By combining a structured feed, rigorous tracking and continuous optimization, you build an efficient system where each element fits together perfectly. By keeping your data clean, regularly testing your configurations and adjusting your strategies based on results, you turn visitors into loyal, engaged customers.
FAQs
How do I check that my product feed is correctly configured in Google Merchant Center?
To properly configure your product feed in Google Merchant Center, start by creating a file containing all the required information. This file must include: the product ID, the title, the description, the product page URL, the image, the price (expressed in euros with a comma as the decimal separator) and the availability. Make sure the file strictly follows the specifications required by Google.
Once the file is ready, import it into Merchant Center via the Products → Feeds section. Then go to the Diagnostics tab to identify any errors. These errors can include issues like an incorrect price format or missing images. Fix each reported issue and republish your feed until it is free of errors.
To make this process simpler and avoid common mistakes, consider using a solution like Feedcast.ai. This tool automates the management and enrichment of product feeds, allowing you to achieve accurate, fast results with no extra effort.
Which key indicators should I monitor to optimize my dynamic remarketing campaigns on Google Ads?
To get the most out of your dynamic remarketing campaigns, it is crucial to keep an eye on two key indicators:
Click-through rate (CTR): This metric shows the percentage of impressions that result in clicks. A high CTR indicates that your ads effectively capture the attention of your past visitors. To improve this rate, ensure your visuals, descriptions and prices perfectly match the expectations of your target audience.
Return on investment (ROI): ROI compares the revenue generated by your sales to the advertising spend. Dynamic remarketing is an excellent way to increase this ratio, making it an essential parameter to evaluate the overall profitability of your campaigns.
By regularly analyzing these indicators, you can adjust your product feeds, bidding strategies and creative assets to maximize the performance and financial results of your campaigns.
How can Feedcast.ai simplify the management of my product feed for dynamic remarketing?
Feedcast.ai is an AI-powered platform designed to simplify the management of your product feeds for dynamic remarketing campaigns. Whether your products are hosted on Shopify, WooCommerce, Prestashop, or even in files like Google Sheets, CSV or XML, Feedcast.ai makes importing them easy in a few clicks.
With its data enrichment tool, the platform automatically optimizes titles, descriptions and attributes of your products. The goal? Improve their visibility and maximize advertising performance.
Another major advantage: Feedcast.ai identifies and fixes errors present in your feeds. This ensures smooth execution of your campaigns and avoids time lost due to technical issues. By centralizing and automating all these complex tasks, you not only save time but also boost the effectiveness of your online ads.
Yohann B.